Painting Physics
It would make sense that when you apply new paint on top of existing, the paint the comes off your roller is going to be thicker in the valleys, than it would in the crests. It is like spreading butter or margarine into a piece of toast. The butter always gets “stuck” in the pits of the toast. When you scrape the toast with the knife to try to control the amount you want on the toast, you can thin out the butter at the crests, but never in the valleys. The same rules apply when you are painting
When you press your roller on the wall, the crest is what touches the roller, and paint is forced into the valley like the butter on the toast. There is only so much paint you can stick on the wall before the paint starts to become too thick, noticeably non-uniform, and difficult to control. This is a physical limitation when working with paint. Fine artists will paint a canvas in many layers because of the lack of control with thick paint. Painting a wall is no different than fine art when regarding these rules. Lets show what one new layer of paint looks like on our existing wall.

If we are able to isolate that first layer of paint that you just installed from your “one coater”, you can see in the picture below, that the paint is thicker in some areas than in others due to the wall texture and roller texture. Notice how the purple arrows have a thick layer of paint between it, but move only a few millimetres over to the right (red arrow), and the layer of paint is thin in that section. If you were to look at this new green paint after the first layer is dry, you would see your new colour, but the old colour still “pops” through in the sections that are thin.

A common misconception is when a wall is covered with paint, it completely blankets or covers the previous paint job underneath making it impermeable and opaque, so as long as ever square inch/centimetre is covered with paint, the thickness should not matter. I often hear
” just paint over it”
Whatever “it” may be. Mildew? Dirt? It doesn’t matter, paint over it!. Lets take a real word example on why this simply does not work. I call this the “blanket solution”.
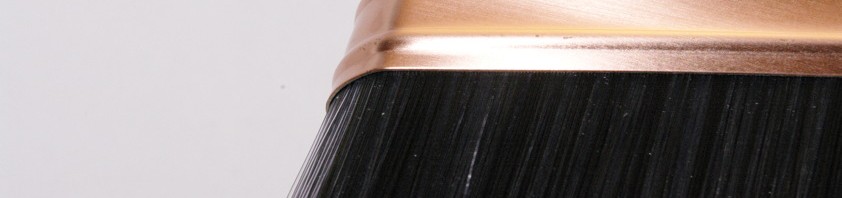
My wife’s professional artisan acrylic paint tubes made by a top-tier company called Golden. The company paints the exterior of the tubes in the factory, so the artist can see the final product before they buy the paint. When we buy a gallon of paint for our walls, you will see the paint clerk very often swabs some paint and marks the top of the can. You must remember, that when artists look at the exterior of their paint tubes, they are not looking only for colour, but other qualities including opaqueness, shine. This top-tier artisan’s paint is definitely not completely opaque as you can see in the picture. The point is, if you were painting a bedroom, and you had to cover the walls in one coat, the paint must be 100% opaque for maximum coverage for the “blanket solution” to work.


It can clearly be seen that the printed lines under the paint on the Golden acrylic tube can be seen through the paint even though it is completely covered. Acrylic paints like these that come in a tube are very viscous. The paint will squeeze out of the tube in a “tube” shape because it is very thick, similar to toothpaste. House paint has a lot more fluidity. So thickness of the paint does not necessary have to do with the ability for the paint to cover a wall. This term is called “coverage”.
Items we often think of as opaque items that are not really opaque when we inspect them a little more closely. This effect can be seen by using a standard household black or green garbage bag. Open it up, and hold it 1 to 2 inches away from a compact florescent light bulb (13 w or more). Incandescent and halogens are too hot and will burn the plastic, don’t use those. Now look right at the light bulb through the plastic. You should be able to see the light coming through the plastic. I always thought a garbage bag was as opaque as it gets, but it is not 100% opaque. This is the opaqueness factor, and unless this “one coater” paint was 100% opaque, you will see the coat underneath (where the red arrows are in the previous pictures). There is nothing to debate now about coverage. It is very obvious that the ability for one coat paints to cover a wall has been proven to be implausible.
Lets take a look at the thickness of two coats of paint looks like.

Notice that the valleys of the first layer (where paint likes to go) happens to be exactly where the first layer paint was at it’s thinnest. Of course it is the same area where the paint was see through. Now lets look at the thickness:

With all other elements removed, we can see the thickness of our new colour of paint. Even though the first layer had a inconsistent thickness, the two layers combined produce a relatively uniform thickness. There are no areas where we can see through. Good paint job, I say.