Ceramic tile floor cracking: Why the scratch coat method doesn’t work well

An uncoupling membrane sample.  This one is made by Schluter called Ditra
This is an uncoupling membrane sample. This one is made by Schluter called Ditra.  Uncoupling membranes are best practice for installing ceramic tile installations and the best alternative to scratch coats and backer board installs.  An example of a failed floor with a scratch coat is shown later in this article

The scratch coat method

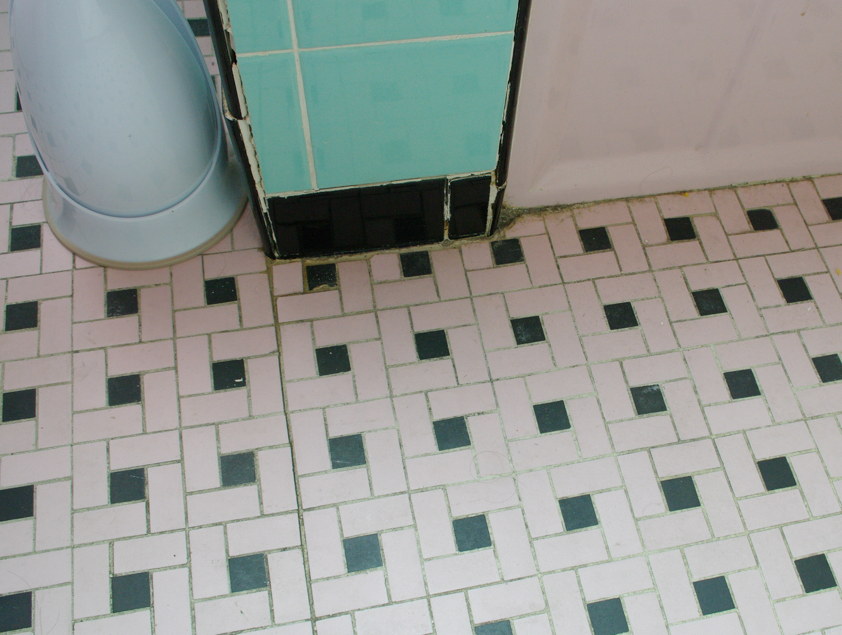
One of the most common and outdated ceramic floor practices used today is the scratch coat method on top of sub-floors and wood joists.  Some people call it the “Jersey mud job”.   This seems to be the most common practice in Toronto for ceramic floors, and maybe Ontario as well.  Failure rates are relativity high within 5 to 10 years from what I have seen with some homes.  Homes with a decent sub-floor do last longer.  Why is this outdated method used?  The simple answer is construction economics and the use awareness of the use of uncoupling membranes is still not known by homeowners and most contractors.  The flooring trades in Toronto’s housing sector have a scratch coat culture that appears to be difficult to shake.

scrach coat
This mesh has been placed over plywood and the nails are bent over to hold it in place as an example of how a scratch coat is applied.  Usually roofing nails or staples are used (I didn’t have any roofing nails for the picture, sorry).   Afterwards, a layer of thinset mortar is troweled in place and allowed to set.  It is usually thin, maybe 1/8″ thick.  A real scratch coat would be using the galvanized steel lath that looks slightly different than this plastic one.

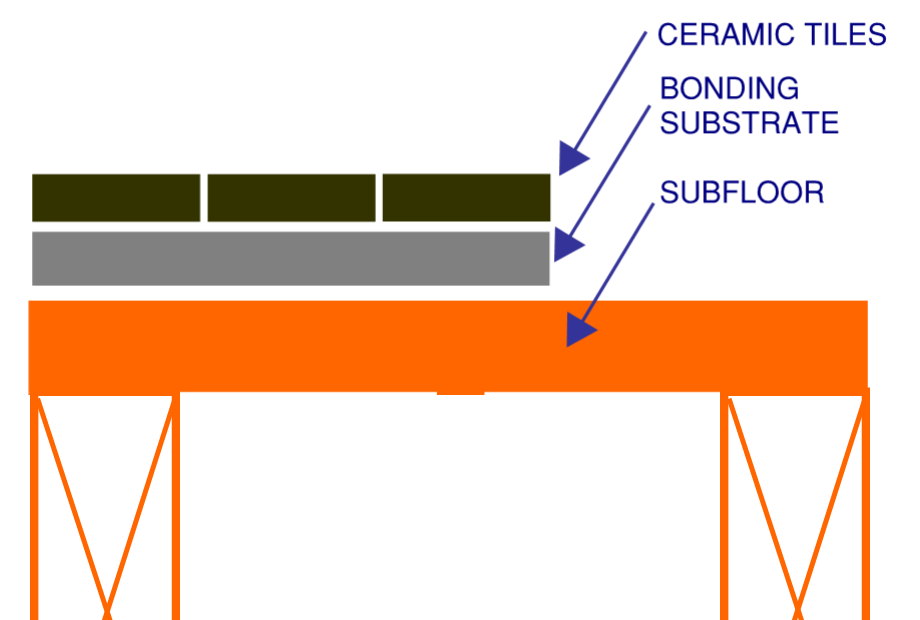
The scratch coat method secures the the ceramic tiles to the sub-floor and joists as best as possible.  It is the philosophy of maximum control of your building components and structure as a whole.  The firmer, the better.  This is similar to the philosophy of maximum vapour control of using polyethylene vapour retarders (barriers) anywhere you think you are controlling the movement of water vapour, which not surprisingly also doesn’t work that well.    The scratch coat is installed by using a sheet of metal wire that sort of looks like chicken mesh and nailing it down to the plywood sub-floor.  The nails are installed between the mesh and purposefully bent over top the mesh as to hold the mesh down tight to the sub-floor.  Thin set mortar is forced between the mesh, and when it sets, ceramic tiles can be installed as they have something else ceramic to bond to as it can’t bond to the metal.  The steel mesh was thought to control the expansive forces, removing the possibility of cracks.

The reason for this type of practice from what I have heard from installers is that they believe it is similar to the function of re-bar in concrete.  Many people assume that this is a good method because it “controls” the movement of ceramic tile, whatever that means.  We have all seen ceramic tiles in various houses where the tile has de-laminated  from the floor and has become loose at the grout or the tile has cracked in half.  When I ask a homeowner why do you think this happened, the assumption I often hear is somehow the tiles were not tightly adhered to the floor with cheap materials and a lot of mostly dumbfounded looks.  Although substandard material failures do happen, most often it not always the underlying reason why the floor tiles crack or de-laminate.   As I have mentioned in previous articles, your house moves for various reasons and ceramic products such as tile and grout don’t handle expansive forces well and must be taken into account when installing any new component in your home.

Lets look at the physics on why this total control philosophy doesn’t really work a little later on.

This is a cross section of a ceramic tile floor

ceramic floor v final
There is a bonding substrate between the tiles and the sub-floor. The bonding substrate is either made of a scratch coat, cement backer board, or an uncoupling membrane. It’s purpose is to combine compatible materials


Expired sealants and caulking: Check them like eggs.

caulking gun

We don’t think to look, but sealants (caulking) do expire so check the date before you buy.  Most companies will put an expiry date on the sealant itself.  When buying a loaf of bread or eggs, usually you can push the date a little if need be, but I don’t advise that with sealants or construction adhesives, especially with silicone.  Old silicone has the tendency of not curing properly.  What happens is after you apply the silicone, it is still “wet” and never cures.  Save yourself some trouble and dispose of old sealants. Usually the sealants are good for about 12 months or so.   Some other less expensive sealants like acrylic (alex plus is a good example) have a similar shelf life, however from my experience, you can push it a little longer if you expect little movement in your application as the acrylic tends to set (dry out) rather than stay wet as with silicone.

Buildingology lessons learned

  • Check the expiry date of all sealants
  • Don’t use expired sealants, or you will end up having to clean it up.

Shower benches and knee walls: How to prevent water leakage

Greatly detailed knee wall.  There is an overhang, and a clear silicone drip edge created just under the lip.  If you have trouble seeing it, that’s a good thing.


It is all too common that in showers, water leaks into the wall causing damage to the studs insulation and substrate holding the shower in place.  This usually happens happens from a crack in the grout from where one shower wall meets another.  The leakage that usually causes this type of damage is very often a small of water adding every day as you take a shower and occurs over the course of months, years and possibly decades.    It can also happen between shower grout, but that usually occurs in older showers.  Usually.  But that will not be the focus of this article.

Do not use grout in shower wall corners or under benches

Grout cracks
Grout cracks due to inability to accommodate movement.  The crack is very small but it is enough to leak water in the walls.  This small leak can swell the wood structure causing the crack to become larger, and more water would enter.  Within a few months or years, a crack like this can soak the wood frame behind it to rot and cause mould.  Fortunately I caught it soon after installation, and fixed the problem wit a bead of silicone on top in addition to the silicone drip edge (discussed later)


The issue with grout is not so much that it cracks, but that is has no accommodation for expansion movement like any masonry based product. Every concrete building has steel rebar to counteract the expansion forces.  This has nothing to do with the way it was installed, it is just a characteristic of a home with a wood frame that moves with seasonal humidity fluctuations.  Everything moves even to such a small degree as seen in the photo above.  Look how small the horizontal crack is.   So during your installation, you must plan for this eventuality.  You might think bah, that crack is tiny, whats the worry?  I can tell you that it is big enough for water to enter, and that is all that matters.  This scenario leading to failure is more common than you may think.  The solution is  twofold.  Do not install grout in the corners flush to the tile because grout is so strong in compression, it does not allow for as much movement as no grout.  Those walls need the ability to move towards each other without the grout in the way.  It is possible that the surrounding tiles crack or adjacent grout joints to fail because of having the grout there.  The best solution is to put grout a small amount the corners, and not very deep.  The intention would be that the grout provides a substrate for your silicone sealant on top.  It helps provide continuity, but don’t expect it to stop water.

So how is that problem addressed?


It is actually quite simple and for those of you who have older showers, you can do this too. Just make sure your tiles are as clean as the day they were installed.  You must have no soap scum on the surface or it wont work, so give it a good scrubbing.  Just install thick dose of silicone sealant on top of that grout, and that should be the finished product.  It is definitely most difficult to tool the silicone over natural stones like this one, and doesn’t provides the cleanest look.  In this scenario the walls can move and the joint will not delaminate or crack as silicone can accommodate the movement.

This is not the cleanest look, but it give you less headaches in the future

Just a note about the silicone:  Quality tile stores sell acrylic sealant that closely matches the colours available.  That is great, but the only issue is that acrylic sealants don’t accommodate movement as well, and have a much smaller service life especially in regards to mould.  The mould will appear much quicker if it is in contact with a lot of water which looks disgusting.  This is not “A” brand vs “B” brand, it is just the properties of the acrylic, additives included.  Silicone is the best choice, however the palate is very limited to about five colours.  My favourite silicone is “GE silicone II” sold almost everywhere, but it is more expensive at about $5-6 each.  Two tubes should do an entire shower with some left over.  If your shower or bathtub drains correctly, the silicone can last upwards of 20 years or more.

Create a drip edge using silicone

Creating a drip edge such as this one (its hard to see because the silicone is clear)  allows the water to fall straight into the pan, as opposed to running down the wall

In addition to putting silicone in the corners, applying a bead of silicone under the edge of the lip creates a drip edge that ensures that water doesn’t run down the wall, but instead falls straight into the pan.  Don’t expect your contractor to do this unless you ask for it.  Drip edges are vitally important for reducing water entry into a wall.  Drip edges can also be created during the installation by cutting a thin line (saw blade thickness) on the underside of the tile where the lip is exposed.  I don’t like this method as much, because in a shower setting,  not everyone remembers to seal the tiles in the new crevasse that was created with the saw blade, which is hard to do.

Buildingology lessons learned

  • Always use silicone in the corners of every shower
  • Silicone is better than acrylic sealant in terms of mould resistance
  • Dont use grout in the corners of the shower to the finished edge.  Given enough time, they will crack
  • Always overlap shower benches and knee wall lips
  • Create drip edges under knee walls and shower benches

Sanding Hardwood Floors? Test for lead first, and remove it safely

How to test for lead

Recently, It was time to sand some floors as the wear level was low.  Some hardwood floors installed 1977 or before contained lead in the finishing layer.  Having lead in the floors was very regional and installer specific.  Some areas of North America never had any lead used in the finish at all.  Some people liked to use lead, some didn’t.  I went to my local hardware store and bought a lead test kit at about $10.  Make sure you test it in an inconspicuous area, maybe in a closet where the finish has not been disturbed too much.  After my test was complete, it was very apparent that there was a positive result as you can see from the photo.  If you get a positive result, it is a good idea to get that result verified from an environmental testing company.  In this case, a piece was ripped out from the hardwood from the closet.  I had dropped it off at my local environmental testing company, who verified a 1% lead content.

The dangers of sanding floors

Sanding and retaining and applying some new polyurethane on a floor without question can save thousands of dollars instead of replacement, however if you should not sand your floors at all, that has lead content.  Some companies have some excellent equipment that they market as able to capture 99% of dust or even more.  These dustless systems are fantastic from reducing the absolute chaos of dust getting everywhere involved with sanding a floor even when the room is depresurized.  Remember that the issue is not just about the amount of dust in the air, but the size of the particle that these systems can catch.  99% sounds like alot, but is no where near safe.  Dust particles are not easy to control.  If you are at all familiar with sanding  you will know that the only true method to reducing dust particles is to literally use plastic to encapsulate a room.  Not many lead particles are needed to be inhaled cause problems with your health.

Test it yourself first for one good reason, dont rely on your contractor.

The reason is quite simple.  Most hardwood installers don’t test.  You will know if your contractor tests for lead in your house because the testing kit has a very strong distinctive smell that will fill up the room,  it is very pungent and unpleasant.  I spoke to a reputable installer in Toronto and said to me “I have not come across that in 25 years”.    In a cookie cutter post WW2 house, and I can tell you many others on the same street probably had it too. This reputable installer just didn’t test over that time.  If you have had your floors sanded recently and are concerned about airborne particles, most environmental testing companies provide on-site air testing to determine if the air is safe.  Lead particles do not stay in the air too long and settle, but end up in unwanted places making cleanup more difficult.

Safe removal

Standard practice of hardwood removal with no lead content is to cut the floor with a circular saw in 4 foot strips which are easy to manage.  When I was discussing removal methods with the hardwood flooring installer, they glazed right over this point, which also adds a large amount of dust into the air.   So if you decide to let them do it, they better not cut strips in the floor. The method that was eventually used, was removing one plank at a time, without damaging the finish.  It was easily more than twice the amount of labour, but lead particles did not end up in the air.  Usually the environmental testing company will have project managers to guide you on other proper removal techniques.  Lead abatement will cost approximately the same as new hardwood floors, so most of the time, it is better just to remove it.  When thinking from an environmental standpoint, dangerous particles that are contained, or not airbourne is always favoured over airborne (Think of CO2 in the air vs CO2 capture).  Removal is most likely the more environmentally friendly choice.  Different jurisdictions will have different rules about disposal of lead content boards.

Buildingology lessons learned

  • Always test for lead yourself first with an inexpensive test kit if you decide to sand your floor
  • If a positive result appears, verify from your local environmental testing company
  • Never sand a floor with any lead content, even if it is lower than 1%
  • “Dustless” sanders from professional flooring companies are effective for minimizing dust, but are not perfect, and not suitable for lead removal.
  • Standard strip cutting removal methods can’t be used.
  • Most environmental companies employ project managers who can guide you in proper procedures.
  • Entrapped lead in your hardwood is more environmentally friendly that releasing the lead into the air

Does the one coat solution of “top-tier” paint really work?

Big box store paints have appealing advantages to the average homeowner.  Yes, it is convenient to have all the items you need in one store.  At approximately $30-$40 per gallon for a supposedly top tier paint, the prices are competitive without question.  But on closer inspection, this deal is probably not so great.  I would like to point out at this time that many people, couldn’t careless about the quality of paint on their walls.   I think this is the case for good reason….who is really going to notice it?  It’s a fair question.  A better question is “Is someone else going to notice it?”.  It is curious characteristic of human nature that we only notice how bad something is when someone else points it out to you.  If you prefer your bliss, read another article.  If you to take bite of fruit from the paint tree of knowledge, read on.  Disclaimer:  painted fruit tastes funny, and is harmful to your health. Don’t bite it.  They belong on fridges pained by your niece or art by Paul Cézanne.

The one coat solution.  Why paint twice when you can paint only once?

It is appealing for sure.  Who in their right mind would choose to paint a room twice when you could do it once?  Honestly those people are suckers.  You could easily make fun of them for being out of touch with the latest paint technology.  “You paint a room like my grandparents, with lead!”.  Our culture is fixated on performing tasks faster whatever they may be.  The tag line goes something like “would you rather spend more quality time with your kids than painting?”.  It’s a fair point.  Can we really paint walls with only one coat, when we can paint it with two?.  Somewhere the idea was lost that maybe painting a room with your kids is better than for your kids.  Lets focus on the paint facts instead on what is ideally right.  If one coat is better that’s fine.  So let’s see if it is actually possible.

Here is the truth, paint, such as it is and how it is applied on walls today, with rollers, brushing and spraying will never…ever…be able to be applied effectively in one coat.  This has nothing to do with the chemical composition of the paint formula at all.  It has to do about the laws of physics, and the maximum thickness possible for one layer of paint before it gets too thick, and starts dripping off the wall.

Texture

Every wall you are going to paint has a texture that is not smooth as enamel or paint on car.  It is rough in texture, and has many crests and valleys.  This is a normal texture for a wall.  Below is a standard wall up close.  You can see the texture, and notice when a light is pointed almost parallel to the wall, the contrast is increased and you can really see the crests and valleys.

A black picture frame is on the left. The wall is pitted with crests and valleys.
A flashlight was shined parallel to the same wall as in the previous picture. You can really see the crests and valleys


This texture is even created on new drywall when the first coat of primer is applied.  Lets take a look at the existing conditions.  The following pictures is what the paint looks like if we look at the thickness of the materials only.  We will view a section through the wall in plan view (birds eye).  Notice that the tan/yellow coloured paint has crests and valleys like the previous picture.

Here is the tan / yellow coloured existing paint from the wall. The blue block represents the thickness of the drywall under the paint


Plumber’s putty or silicone around your toilet?

When installing a toilet, the final step involves creating a seal around the toilet to the floor.  Some plumbers use plumber’s putty, some grout the toilet to the floor and others use silicone sealant (caulk) for that final connection.  The application of silicone is much quicker and experienced plumber can probably do it in just a few minutes, where the plumber’s putty may take more effort and time.

You can see the plumber’s putty line. It is tan coloured, and slightly dirty.

Silicone

If you have any young children who like to flush things down the toilet, you may have to remove the toilet to remove a toy, or even car keys.  This is a very common issue.  The silicone sealant, can be cut really easily with a sharp knife, but when you have to put the toilet back on the floor, the old silicone is stuck to the toilet and floor, and can be really difficult to remove.  Yes, you must remove the old silicone before you put the toilet back on.  Don’t forget to use a silicone remover to remove the residue left behind on the toilet and the floor.  A product called “Silicone be gone” by DAP is a good product and is available at most hardware stores.  The biggest advantage to silicone is that the product is very sticky and is easy to achieve a good seal around the toilet.

Plumber’s putty

The putty provides a little bit of  stability in preventing your toilet from rocking back and forth ever so slightly when you sit on it (or stand).  The only issue is if the toilet is not tightly secured to the toilet flange and rocks, your seals is gone, where silicone may be a bit more forgiving, but not much.  You also have to contend with the fact that the putty gets dirty after a few years.   Also, the putty will dry out slightly after a few years, and shrinks ruining your seal.  If this really bugs you, you can always shave the surface with a knife and apply a fresh layer on top.  It takes about 10 minutes to do that.

Grout

This is something I have only encountered recently. It provides a perfect fit. Yes its a great seal, but how the heck will I ever be able to remove it?

I have recently switched to using silicone as a preferred method due to the fact that it maintains the best seal against sewer gases entering the home.  The cost?  A tube of quality silicone costs about $6.  The putty costs about $2.50 for a small container, so cost should not be an issue when considering this purchase.

Buildingology lessons learned

  • Silicone is easier to install, but more difficult to remove when servicing against plumber’s putty.
  • Silicone provides better seal to the floor during installation due to stickiness, and has better resistance to expansion after it sets, which for both reasons, it my preferred method.
  • Don’t use grout.  Ever.

Which Furnace Filter is right for you? Are washable filters the most environmentally consious choice?

You may ask yourself, do I have the technical know how to determine what is best for my HVAC system?  The answer is a definite yes, it is not difficult, but will take a little bit of reading to understand how the system works.

Why you should care

Forced air HVAC systems require a cartridge “media” style furnace filter for my furnace.  We know what they look like.  The packaging usually says “16x25x1 or 20x25x1.”  When you go to the big box store, there are so many furnace filter types and it is easy to get little overwhelmed from what seems should be a really simple choice.  To complicate matters, HVAC experts can’t agree on what is the best method of filtration as there is a wide difference of opinion.  I think this is attributed to the fact that a “one size fits all” solution does not really exist.  Who cares honestly? Well you should, the type of filter can affect the life of your furnace, your health, and the energy efficiency of your system as a whole.  It is possible that your 95% efficient furnace with a variable speed ECM motor can consume the same amount of natural gas as a 92% furnace because of poor airflow or using the wrong filter.  It’s a bold statement.   More often than not, the most expensive disposable filters are not necessarily the best choice for the average homeowner’s furnace.   The analogy I would use is filling your car with 92 octane gasoline, when the car manufacture specifies 87 in the owners manual.  Despite that many people feel 92 octane is cleaner and therefore better for their car is a misconception which is still debated to this day the same as furnace filter quality.

Who is going to cough first from poor air quality, you or your HVAC system components?

Indoor air quality needs for a person is not necessarily the same as the HVAC system component needs.  Those two different needs are far too often blurred as the same requirement.  Furnace components are expensive to replace.   They can and sometimes do fail prematurely by getting dust trapped in the blower, heat exchanger or air-conditioning coils.  This is especially the case with ECM variable speed motors in 95% efficient furnaces, as they are prone to failure if it is running at full speed for weeks at a time.  This is far longer than a variable speed is designed to run. You can be surely kicking yourself for not spending only a little bit of time once in your life to learn about filters and $5 t every three months on the proper filter for your system, so listen good.

At first, I found it hard to find good information because there are a lot of useless marketing out there about your HVAC systems requirements.  It is easy to get confused from what should be a simple choice to buy their product.  As mentioned before, the requirement for a furnace/air-conditioning  filter to function properly is not necessarily the same as the requirements that a human has to feel comfortable.  What I mean by this, is your filter can be doing it’s job properly, but you may be sneezing from pet dander.  Obviously in that scenario, you don’t have a good enough filter.  Or in a different scenario, possibly your furnace model can be sensitive to particulate matter and running too often with high static pressure, and you are a rough and tough human being affected by the extra particulate matter in the air, and you don’t feel the difference.  Just know that your requirements are not necessary the same as the furnace’s.

Pressure Treaded Decks. Repair or Replace?

Here is a hypothetical scenario (that I ran into last month)   Take a guess on which options are more environmentally friendly.  This is not as easy as you think.

You have an old patio deck that is 10-15 years old made of pressure treated wood.  The stain is almost completely gone, and the wood has splintered in many areas and in rough shape. You think the deck is at the end of life, but you are not sure.


Here are your options for the plan of action.

  1. Replace the deck with a more environmentally friendly product that uses 75% post-consumer waste as the main decking material.
  2. Stain the deck again, by pressure washing or sanding the old stain off, and make small repairs where needed to try and extend the life.

There are other options of course, but lets stick with these two for the time being.

The answer is…

It depends, but probably #1,

but most likely not for the reason you think!

The reason why #1 is probably a better choice is because prior to 2004, pressure treated wood was “treated” using chromium and arsenic.  The wood is called Chromated Copper Aresenate (CCA) pressure treated.  Yep, companies actually put carcinogens in our decks if you can believe it, until it was banned in residential use in Canada and the US.  Side note: it is still used in telephone/hydro poles today in new installations.  Today, the residential sector mostly uses Alkaline Copper Quaternary (ACQ) or less common  Copper Azole pressure treated, which is far less carciogenic, but also has it’s caveats which I will not discuss in this article.  Its also the stuff that’s now available at the big box stores.   You may have read about CCA  in the news about ten years ago about this stuff being used in playground equipment in public schools.  Ring a bell?  There is a website devoted to this stuff noccawood.ca though slightly out of date, it still has good articles.

My first gut feeling for this answer is to prolong the life of the deck, to reduce the amount of waste that ends up in the landfills by staining the deck.   Of course that deck will eventually be land-filled, but you are consuming less by protecting what you have now.  It’s like buying a new car ever three years when a lease expires.  Granted, someone else does use that car after three years, but no one will use your deck after you throw it out to the landfill.

The environmental issue here is, to properly stain a deck, you need to pressure wash it (or sand it).  If someone came in to pressure wash that deck, some of the chemicals are still encapsulated in the wood, but not nearly as much as when it was new.  The pressure washing could scatter some of those chemicals out of the wood.  The amount is not much, but I still would never recommend doing that.  Contained environmentally friendly items are always safer than uncontained.  Also, the soil directly under the deck is the area that will have the most chemicals in it.  When the deck is eventually removed, it must be done so with great caution, and the deck itself has no possible second use, and it’s life cycle ends.  It must go to the dump as the chromium and arsenic cannot be extracted from the wood, and cannot be buried or burned.

This is a similar concept as Green Houses Gases (GHG) in that carbon dioxide is trapped or stored in vegetation, and is released into the air when burned.  The pressure treated deck stores in the carcinogenic chromium and arsenic, it is safer to have it trapped in the wood, than all over your lawn.  Most likely you will have the highest rating in the soil within two feet beside of an installed CCA pressure treated deck (or under it).   If you had this done in the past don’t freak out, if you had a good installer, they may have been extra careful, and you are probably fine.  If you are skeptical, get the soil tested.  You could use an environmental testing company.

I guarantee you that not every decking company will take great caution when repairing or removing.  Make sure they don’t use their saws to remove the old wood spewing sawdust in the air with this stuff.  When you hire that deck company ask them what their removal procedures are, and keep in mind that the soil underneath the deck is probably contaminated.  Do your research.

Buildingology lessons learned

It doesn’t matter that scenario #1 has the recycled content, it is not nearly as important as the handling and disposal of the old deck from an environmental standpoint in this particular scenario.  This of course is a tad oversimplified, but it is important to know that performing the most environmentally friendly action in home renovations does not always carry labels or bragging rights with it (if that is important to you).

Here is a new question… If you get a new deck, is option #1 or new style ACQ pressure treated more environmentally friendly?  The answer is as always “it depends”.

Home Improvement Blog With A Taste Of Environmental Conscience. It Tastes Good.

Type of home improvement →  long term mindset

This blog is to educate homeowners on all matters regarding how their building works.

I also want to focus on methods of fixing your house that has an environmentally conscious element to it.    This is not exclusively the type of green where when you buy a product that advertises “green” or “eco” on the label, and where the homeowner gets satisfied that they did the right thing.  Don’t get me wrong, it’s good to have that satisfaction, but it is even better to know that the process of your home repair is well thought out, that you are trying to do the best you can.  It is far more important that you are taking into account the long term effects of you current home improvement choice, than just basing your design on picking that “green” product.